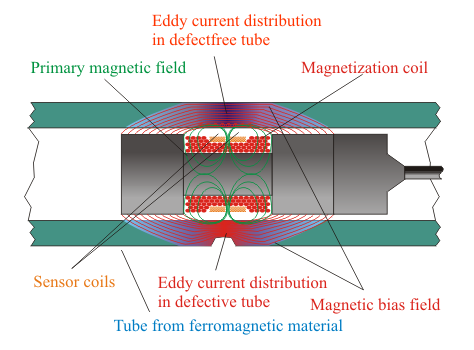
The eddy current principle with superimposed DC field magnetization
Due to the high relative permeability of ferromagnetic materials, the penetration depth of the eddy currents in ferromagnetic materials is limited to a few tenths of a millimeter. As a result, defects at the tube side far from the sensor are not detectable by the conventional eddy-current method. Further inhomogeneity may generate high noise due to the different magnetic alignment of the so-called "Weiss domains" in the material.
For the inspection of ferromagnetic tubing using the eddy current principle with superimposed DC field magnetization (magnetic bias eddy current) the effect is used, that the relative permeability of a ferromagnetic material can be changed by a constant magnetic field. The figure shows the structure of an internal eddy current sensor with integrated DC field magnetization.

The sensor is basically the same construction as the sensor for testing non-ferromagnetic tubes, but in addition it has a coil or a permanent magnet for generating a constant magnetic field and a magnetically conductive core. The DC magnetic field is distributed uniformly in the tube wall, causing primarily a homogenization of the material and thus a reduction of the noise signal. Since in general the magnetization field strength is not sufficient to magnetically saturate the tube wall, the value of the relative permeability is still much higher than 1, this means that the penetration depth of the eddy current field has not changed significantly compared to the non-magnetized state. If the cross section of the tube wall is reduced by a defect, compression of the field lines occurs, thus increasing the field strength in this area. This local increase of the field strength causes a change of relative permeability at this position. Because this change of permeability is effective to the inside surface, it is detected by the eddy current field, even though this has virtually no depth of penetration. Due to the described effect defects can be measured on the outer and the inner tube side. This method is well suited to detect pitting corrosion and local defects in tubes made from ferromagnetic material. The signal amplitude, which can be evaluated, is related to the defect volume and therefore the general shape of the damage should be known in order to create a calibration with similar reference defects.

